Télécharger gratuitement logiciel SubmarineS [v 3.4.2] en quelques clics. met à jour régulièrement les informations de la version complète de logiciel SubmarineS [v 3.4.2] sur tutorialtele.blogspot.com. c'est une version gratuite de logiciel SubmarineS [v 3.4.2] sur tutorialtele.blogspot.com.
D?truisez les sous-marins ennemis avant qu'ils ne vous ...]]>
samedi 14 juillet 2012
iObit Game Booster [v 3.4]
Télécharger gratuitement logiciel iObit Game Booster [v 3.4] en quelques clics. met à jour régulièrement les informations de la version complète de logiciel iObit Game Booster [v 3.4] sur tutorialtele.blogspot.com. c'est une version gratuite de logiciel iObit Game Booster [v 3.4] sur tutorialtele.blogspot.com.
Optimise les performances du syst?me afin que celui ...]]>
Shogun 2 Total War
Télécharger gratuitement logiciel Shogun 2 Total War en quelques clics. met à jour régulièrement les informations de la version complète de logiciel Shogun 2 Total War sur tutorialtele.blogspot.com. c'est une version gratuite de logiciel Shogun 2 Total War sur tutorialtele.blogspot.com.
D?chir? par une guerre sans fin, le Japon conna?t ses ...]]>
San Andreas : Multiplayer [v 0.3e]
Télécharger gratuitement logiciel San Andreas : Multiplayer [v 0.3e] en quelques clics. met à jour régulièrement les informations de la version complète de logiciel San Andreas : Multiplayer [v 0.3e] sur tutorialtele.blogspot.com. c'est une version gratuite de logiciel San Andreas : Multiplayer [v 0.3e] sur tutorialtele.blogspot.com.
MOD gratuit massivement multijoueur en ligne pour la ...]]>
vendredi 13 juillet 2012
Lost Planet: Extreme Condition Colonies Edition
Télécharger gratuitement logiciel Lost Planet: Extreme Condition Colonies Edition en quelques clics. met à jour régulièrement les informations de la version complète de logiciel Lost Planet: Extreme Condition Colonies Edition sur tutorialtele.blogspot.com. c'est une version gratuite de logiciel Lost Planet: Extreme Condition Colonies Edition sur tutorialtele.blogspot.com.
Inclut tout ce qui fait de l'original Lost Planet un ...]]>
Barricade [v 3.5.0]
Télécharger gratuitement logiciel Barricade [v 3.5.0] en quelques clics. met à jour régulièrement les informations de la version complète de logiciel Barricade [v 3.5.0] sur tutorialtele.blogspot.com. c'est une version gratuite de logiciel Barricade [v 3.5.0] sur tutorialtele.blogspot.com.
Inspir? du c?l?bre jeu de plateau de type course de ...]]>
Dead Rising 2
Télécharger gratuitement logiciel Dead Rising 2 en quelques clics. met à jour régulièrement les informations de la version complète de logiciel Dead Rising 2 sur tutorialtele.blogspot.com. c'est une version gratuite de logiciel Dead Rising 2 sur tutorialtele.blogspot.com.
Incarnant Chuck Greene, vous avez 72 heures pour sauver ...]]>
The Witcher Enhanced Edition
Télécharger gratuitement logiciel The Witcher Enhanced Edition en quelques clics. met à jour régulièrement les informations de la version complète de logiciel The Witcher Enhanced Edition sur tutorialtele.blogspot.com. c'est une version gratuite de logiciel The Witcher Enhanced Edition sur tutorialtele.blogspot.com.
Optimis?e et enrichie sur le plan technique et visuel ...]]>
Battlefield 3 - Back to Karkand (DLC)
Télécharger gratuitement logiciel Battlefield 3 - Back to Karkand (DLC) en quelques clics. met à jour régulièrement les informations de la version complète de logiciel Battlefield 3 - Back to Karkand (DLC) sur tutorialtele.blogspot.com. c'est une version gratuite de logiciel Battlefield 3 - Back to Karkand (DLC) sur tutorialtele.blogspot.com.
Ce pack multijoueur inclut quatre cartes l?gendaires ...]]>
Yea Chess
Télécharger gratuitement logiciel Yea Chess en quelques clics. met à jour régulièrement les informations de la version complète de logiciel Yea Chess sur tutorialtele.blogspot.com. c'est une version gratuite de logiciel Yea Chess sur tutorialtele.blogspot.com.
Jeu d'?checs contre l'ordinateur. Il poss?de une interface ...]]>
jeudi 12 juillet 2012
Lost Planet 2
Télécharger gratuitement logiciel Lost Planet 2 en quelques clics. met à jour régulièrement les informations de la version complète de logiciel Lost Planet 2 sur tutorialtele.blogspot.com. c'est une version gratuite de logiciel Lost Planet 2 sur tutorialtele.blogspot.com.
Une d?cennie a pass? depuis les ?v?nements du premier ...]]>
BVS Solitaire Collection [v 7.3]
Télécharger gratuitement logiciel BVS Solitaire Collection [v 7.3] en quelques clics. met à jour régulièrement les informations de la version complète de logiciel BVS Solitaire Collection [v 7.3] sur tutorialtele.blogspot.com. c'est une version gratuite de logiciel BVS Solitaire Collection [v 7.3] sur tutorialtele.blogspot.com.
Collection de 405 jeux de solitaire multifonctions ...]]>
Star Wars : The Old Republic [v 1.3]
Télécharger gratuitement logiciel Star Wars : The Old Republic [v 1.3] en quelques clics. met à jour régulièrement les informations de la version complète de logiciel Star Wars : The Old Republic [v 1.3] sur tutorialtele.blogspot.com. c'est une version gratuite de logiciel Star Wars : The Old Republic [v 1.3] sur tutorialtele.blogspot.com.
Forgez votre propre saga Star Wars dans un jeu MMO ...]]>
Cross+A [v 8.20]
Télécharger gratuitement logiciel Cross+A [v 8.20] en quelques clics. met à jour régulièrement les informations de la version complète de logiciel Cross+A [v 8.20] sur tutorialtele.blogspot.com. c'est une version gratuite de logiciel Cross+A [v 8.20] sur tutorialtele.blogspot.com.
Simplifie la recherche de la solution des mots crois?s ...]]>
King Arthur II
Télécharger gratuitement logiciel King Arthur II en quelques clics. met à jour régulièrement les informations de la version complète de logiciel King Arthur II sur tutorialtele.blogspot.com. c'est une version gratuite de logiciel King Arthur II sur tutorialtele.blogspot.com.
D?couvrez l?univers fantastique de la Grande-Bretagne ...]]>
SimCity Soci�t�s
Télécharger gratuitement logiciel SimCity Soci�t�s en quelques clics. met à jour régulièrement les informations de la version complète de logiciel SimCity Soci�t�s sur tutorialtele.blogspot.com. c'est une version gratuite de logiciel SimCity Soci�t�s sur tutorialtele.blogspot.com.
Cr?ez une ville unique, faites s'abattre dessus de ...]]>
mercredi 11 juillet 2012
Lost Labyrinth [v 4.8.1]
Télécharger gratuitement logiciel Lost Labyrinth [v 4.8.1] en quelques clics. met à jour régulièrement les informations de la version complète de logiciel Lost Labyrinth [v 4.8.1] sur tutorialtele.blogspot.com. c'est une version gratuite de logiciel Lost Labyrinth [v 4.8.1] sur tutorialtele.blogspot.com.
Jeu d'aventure dans lequel vous devez vous d?placer ...]]>
Micro Scrabble [v 2.60]
Télécharger gratuitement logiciel Micro Scrabble [v 2.60] en quelques clics. met à jour régulièrement les informations de la version complète de logiciel Micro Scrabble [v 2.60] sur tutorialtele.blogspot.com. c'est une version gratuite de logiciel Micro Scrabble [v 2.60] sur tutorialtele.blogspot.com.
Programme d'entra?nement au jeu de scrabble. Trois ...]]>
Quick Tip: Create a Wet Plate Photo Effect in Photoshop
Télécharger gratuitement logiciel Quick Tip: Create a Wet Plate Photo Effect in Photoshop en quelques clics. met à jour régulièrement les informations de la version complète de logiciel Quick Tip: Create a Wet Plate Photo Effect in Photoshop sur tutorialtele.blogspot.com. c'est une version gratuite de logiciel Quick Tip: Create a Wet Plate Photo Effect in Photoshop sur tutorialtele.blogspot.com.


Recently we showed you how to replicate quick tintype photos. In this tutorial, you’ll learn how to recreate its sister technique, wet plate photography, for an intriguing yet timeless photo effect.
Tutorial Assets
The following assets were used during the production of this tutorial.
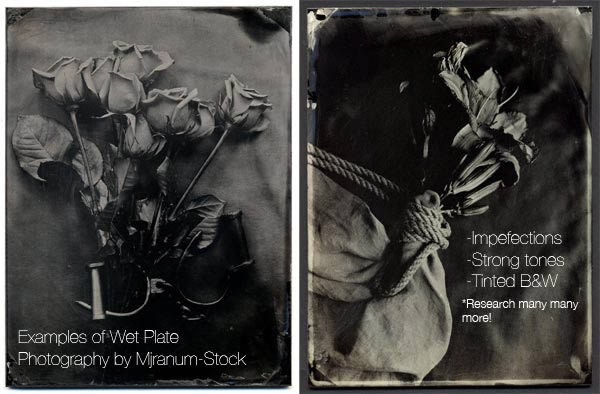
Wet Plate History
Collodion wet plate photography is an extensive process where a glass plate is prepared with several chemical solutions, transferred to a camera to expose, and then developed quickly all before it dries. This technique was used in the early 19th century to produce exquisite black and white photos with incredible detail.
Research
Wet plate photos vary in composition and detail according to the photographer’s preferences and its overall exposure time. Because each photo is unique, it’s important to treat each photo individually by applying only the attributes of the technique in Photoshop. Study the history, process, as well as dozens of examples before attempting digitally to avoid copying the effect of just one photo reference.
Attributes of Wet Plate Photos
Here are some characteristics of wet plate photography to keep in mind:
- Wet plates are generally gray scale (no pure whites).
- Chemicals may produce tinted photo with red, yellow, or blue undertones.
- Streaks where the chemicals drip off are common.
- The imperfections in each photo caused by debris, scratches, and changes in chemical reaction are what make them unique.
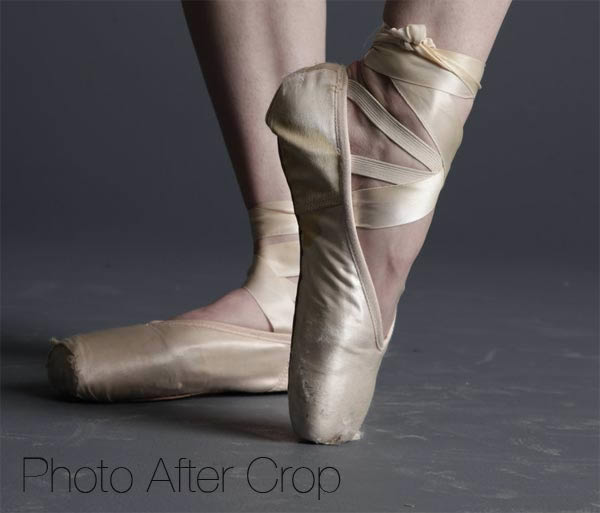
Step 1
Open the stock photo of the ballet shoes in Photoshop. Since the collodion technique is often used to produce haunting photos I chose this stock because I thought it would be great for creating a similar mood. Think about a possible story behind your photo, and how it will affect the overall composition as you work on it. Feel free to add notes beforehand to remind yourself which qualities of wet plate will work best for your particular reference.
Step 2
Let’s focus more on the tension and elegance of the ballet shoes by cropping the photo. Grab the crop tool and crop it so that there is roughly an equal amount of space from the top of the shoe to the bottom. Never be afraid to crop or alter a stock photo to better suit the desired composition.
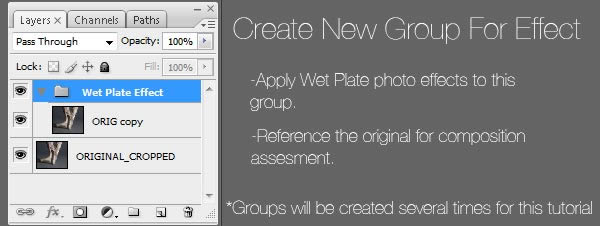
Step 3
I always like to keep a copy of the original to flip back to every now and then. Duplicate the original photo, place it into a group, and name the group” Wet Plate Effect.” This will be the new group where the effects take place.
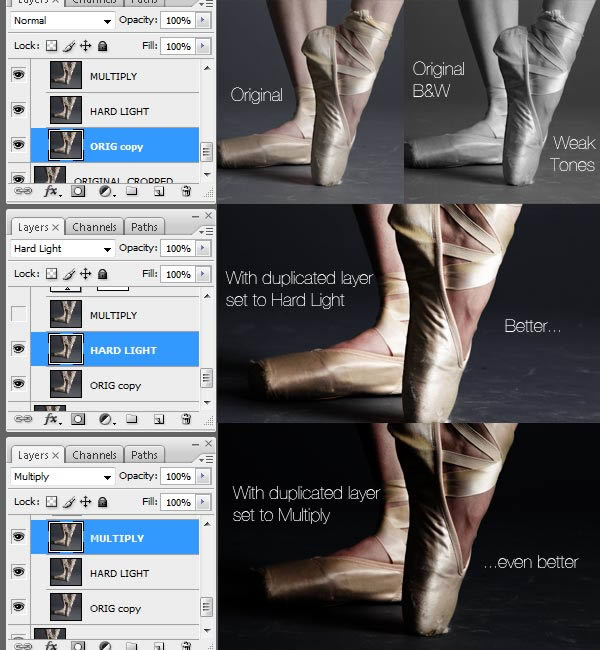
Step 4
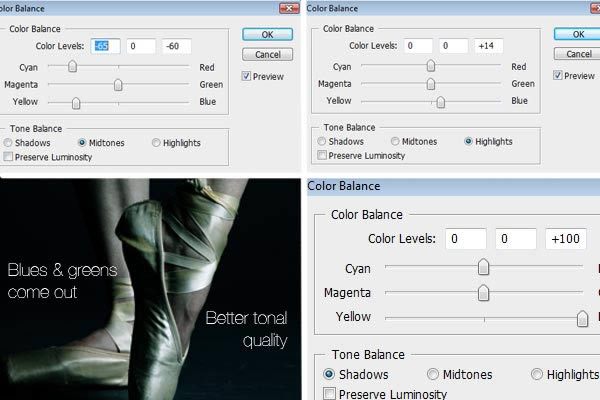
Under the new group, right-click the copy of the original layer and duplicate it twice. Keep the bottom layer normal while you set the second layer to Hard Light, and the top layer to Multiply. The original photo is too light to work in grayscale just yet, so we want to make the tones of the photo richer before applying the black and white effect.
Step 5
Changing the color balance also helps us get more of the tonal quality we want. Go to Layer > New Adjustment Layer > Color balance and add the following properties to the Midtones, Shadows, and Highlights options. The colors are saturated in blues for now, but this option will help us later by improving tonal value.
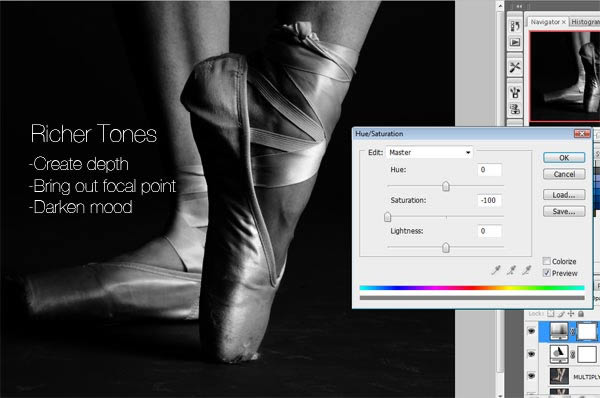
Step 6
Now it’s time to work in grayscale. Add a new adjustment layer for Hue/Saturation and bring the saturation down to -100.
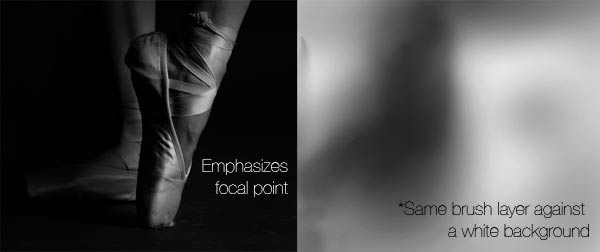
Step 7
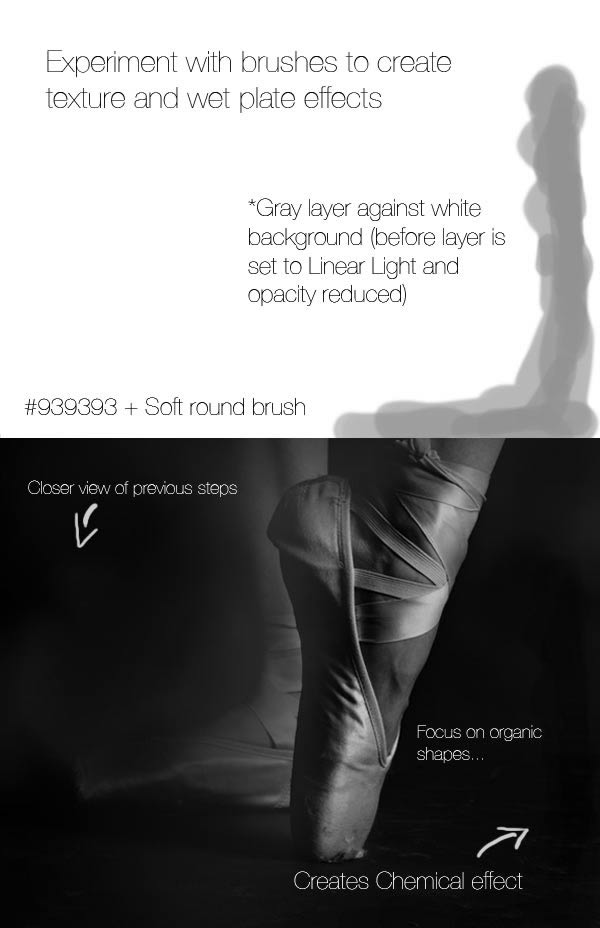
Add a new layer above the Hue/Saturation layer. Using a low opacity, large round brush with a hardness of 0%, apply soft black shadows to the scene to emphasize the front foot. This also creates a softer transition of tones between the feet. Adjust the layer opacity by bringing it down to 92%.
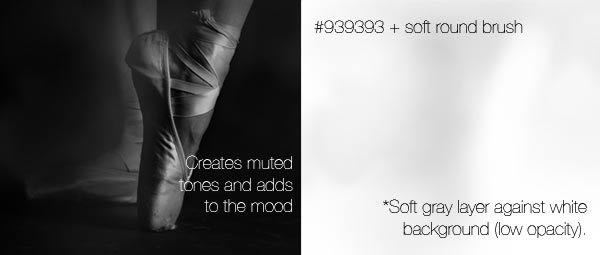
Step 8
Add a new transparent layer. Using the same brush settings, select the color #939393 and build soft strokes of gray to the back foot and leg. Bring the opacity of the layer down to 50%. This technique in combination with the previous step will help to create the soft muted tones often associated with wet plate photography. Feel free to either use the Eraser Tool (E) or the layer opacity to create the desired effect for both layers.
Step 9
Add a new transparent layer. This will be used in experimenting with the smudges caused by the collodion chemical reaction. Using the same gray color (#939393) as before, apply the color to the lower right corner using a round brush with a 70px diameter, 75% hardness, and 60% opacity. Consider this the start of experimentation with the border of your “wet plate” photo. By setting the layer to Linear Light and lowering the opacity to 84%, we’ve created a soft “wet” look.
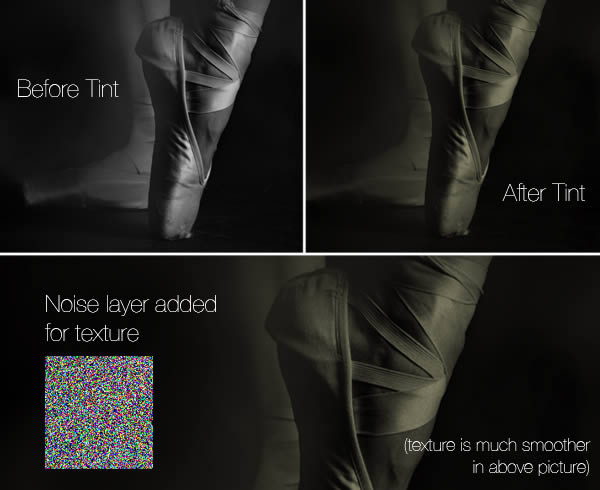
Step 10
Not all wet plates are black and white. Sometimes the chemicals create red, blue, or yellow undertones. For this tinted effect, add a new layer and fill it with the color #938e5a. Bring the opacity of the layer down to 70% and set it to Multiply. Now let’s add some texture to the photo. Create another layer and fill it with the same gray color used previously. Go to Filter > Noise > Add Noise and add an amount of 200% to the layer. Drag the Noise layer underneath the Hue/Saturation adjustment layer so that the color doesn’t show through. Set the layer to darken and bring down the opacity to 18%.
Step 11
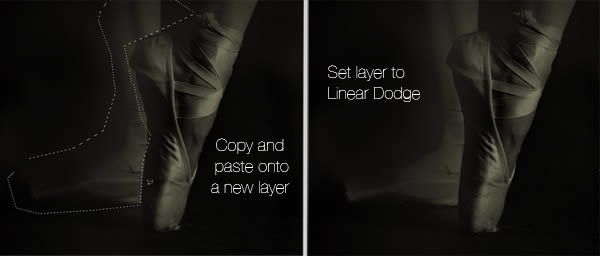
Now let’s work on the contrast between the front and back shoe. Select the “Original copy” layer and use the Polygonal Lasso Tool (L) to trace around the entire back leg. Copy and paste the leg onto a new layer and set it to Linear Dodge. This effect makes the back leg look a little overexposed while the front leg retains its clarity.
Step 12
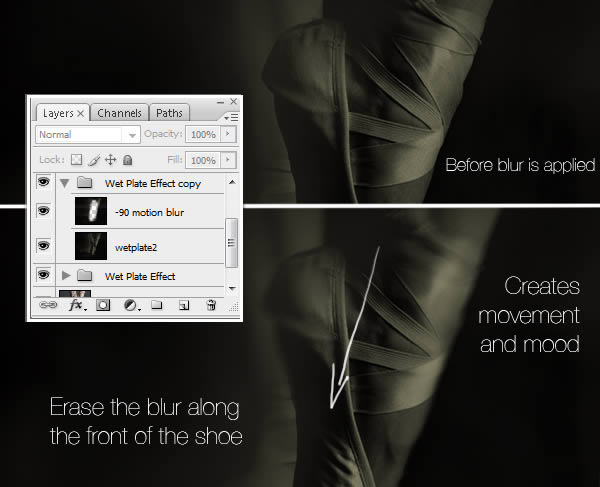
Right-click the “Wet Plate Effect” group and duplicate it. Now in the “Wet Plate Effect copy” group, select all the layers and merge them together. Rename the merged layer to “wetplate2.” In wet plate photography there is often a blur that moves outward from the focal point. In this case the front ballet shoe is our focal point. So right-click the “wetplate2” layer and duplicate it. Go to Filter > Blur > Motion Blur and set the angle to -90 degrees and the distance to 16 pixels. Using a large, high opacity eraser brush with a hardness of 0%, erase along the side of the ballet shoe where the bands and skin meet. This allows the layer underneath to show through to retain enough detail.
Step 13
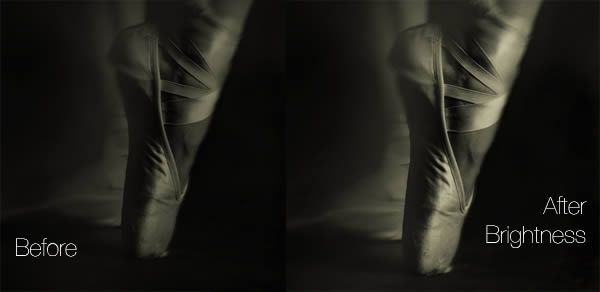
Add a new adjustment layer for Brightness and Contrast. Set the Brightness to +91. Use a large, soft eraser brush and erase over the two large pockets of shadow on either side of the front shoe.
Step 14
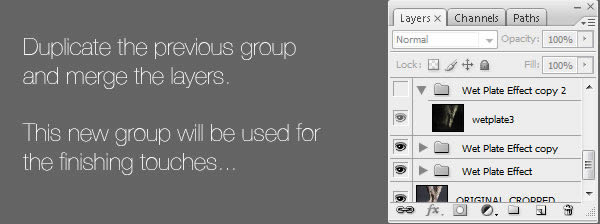
Select the “Wet Plate Effect copy” group and right-click to duplicate. Just as before, select all the layers now in the “Wet Plate Effect copy 2” group and merge them together. Rename the merged layer “wetplate3.” This group will be used for the finishing touches to the photo.
Step 15
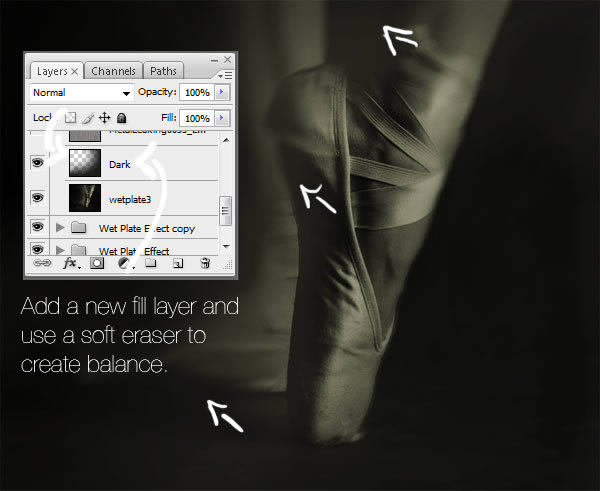
As we finish the photo we’ll continue tweaking the composition to fit the mood. Currently there is too much rich shadow to the right of the focal point. Add a new layer above “wetplate3” and fill it with the color #1d1d16. Bring the layer opacity down to 35% and use a large soft eraser brush to erase towards the left of the front ballet shoe.
Step 16
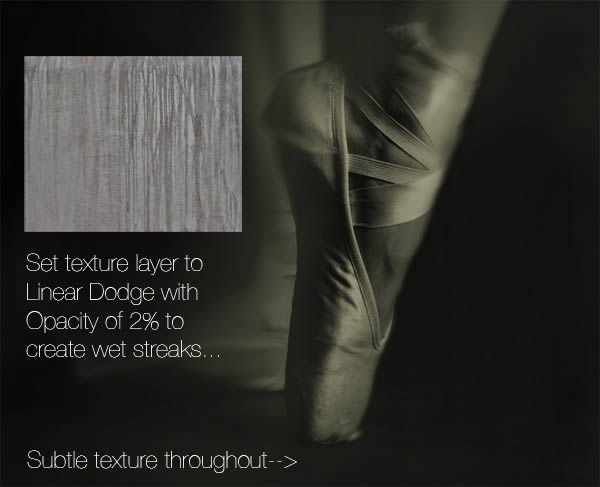
As mentioned before, one of the characteristics of wet plate photography is the streaks from where the chemicals run off. To achieve this look, paste the “MetalLeaking0033” texture from CG Textures onto a new layer. Use the Free Transform tool to adjust the texture so that the leaking effect stretches across the canvas. To achieve a subtle effect, set the layer to Linear Dodge and bring down the opacity to 2%.
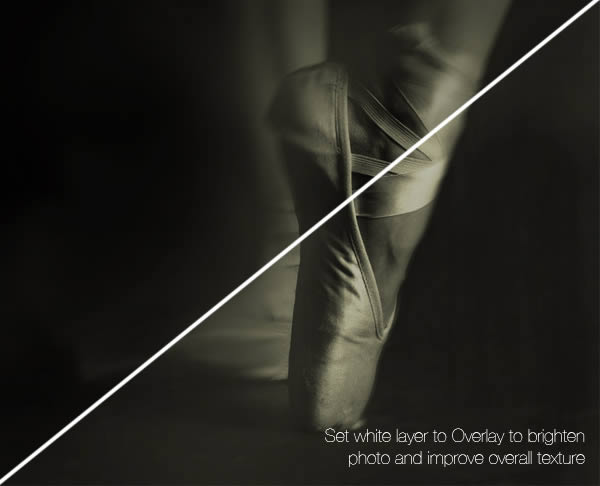
Step 17
Since the overall composition is a little on the dark side, add a new layer above the texture and fill it with white. Set the layer to Overlay and bring down the opacity to 30% to brighten the photo. Notice how the mood is dramatically different from our first steps.
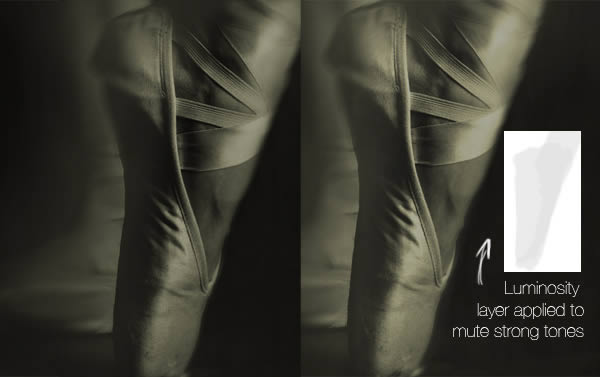
Step 18
These last steps will add character to our piece. Though the front ballet shoe stands out well, the tone is just a tad off from where it needs to be. Add a new layer and use a soft round brush to apply a gray color to the shoe. Set the layer to Luminosity and bring down the layer opacity to 18%.
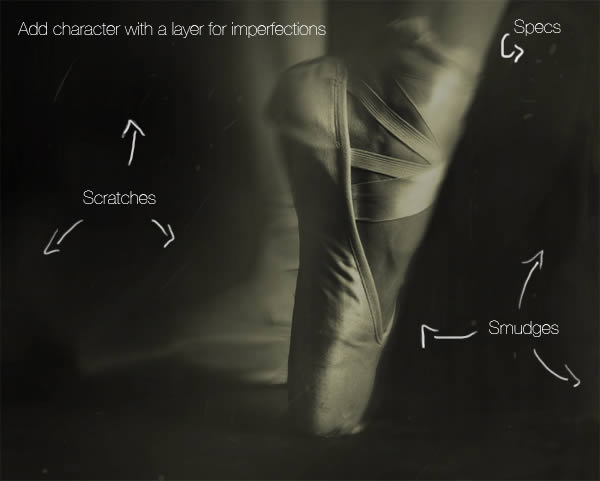
Step 19
The imperfections during the exposure and developing process are what make each wet plate photo unique. Set the foreground color to #f4f4c9. Take a hard round brush and set it to Pen Pressure for use with your tablet. Begin building organic, low opacity shapes, by swiping the brush across the screen. Create specs and scratches by varying your pen pressure. Utilize the Eraser Tool (E) to soften or omit shapes as you see fit. Experiment until you find what works. After, bring the layer opacity down to 14%.
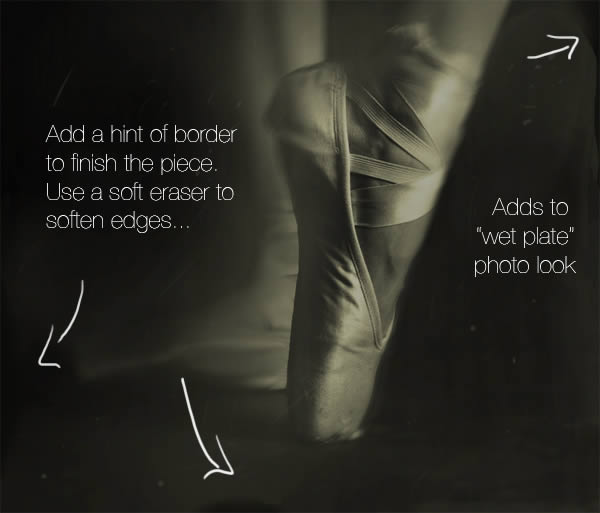
Step 20
To finish this effect, let’s add a hint of a border. Add a new layer and use the same brush settings to apply black strokes along the left, right, and bottom edges of the photo. Use a soft eraser brush to soften the edges for a smooth transition.
Conclusion
You can now create your own timeless photo without all the mess or smelly chemicals. Allow yourself room for experimentation and the time to study the true characteristics of this historic technique.

Ready, Set, Actions
Télécharger gratuitement logiciel Ready, Set, Actions en quelques clics. met à jour régulièrement les informations de la version complète de logiciel Ready, Set, Actions sur tutorialtele.blogspot.com. c'est une version gratuite de logiciel Ready, Set, Actions sur tutorialtele.blogspot.com.


Actions save you time by automating tasks that you perform often. This tutorial is the first part in a new mini-series that will explain Photoshop actions and automation techniques. In this video we will introduce you to actions and explain how they work. Let’s get started!
The Comprehensive Guide to Bevel and Emboss
Télécharger gratuitement logiciel The Comprehensive Guide to Bevel and Emboss en quelques clics. met à jour régulièrement les informations de la version complète de logiciel The Comprehensive Guide to Bevel and Emboss sur tutorialtele.blogspot.com. c'est une version gratuite de logiciel The Comprehensive Guide to Bevel and Emboss sur tutorialtele.blogspot.com.


Photoshop layer styles are a popular way to add effects, such as drop shadows and strokes, to layers in a non-destructive way. With the right knowledge and experience, any effect can be achieved. To achieve these effects, however, you need to understand what each setting does and how they can be combined to achieve a certain look. In this series by John Shaver from Design Panoply, we will explain every aspect of Photoshop’s layer styles feature and show you how to unlock their potential.
In this article, Part 6: The Comprehensive Guide to Bevel and Emboss, we will explain the settings behind Bevel and Emboss, including Contour and Texture, and how they can be used. Let’s take a look!
The Uses For Bevel and Emboss
Bevel and Emboss is often considered the most powerful and adaptable tools within Photoshop Layer Styles.
The traditional use for Bevel and Emboss is to make something look more 3-dimensional by adding highlights and shadows to different parts of your layer, but it doesn’t stop there.
With some special consideration and careful tweaks, you can create styles ranging from reflective chrome and refractive glass to chiseled stone and subtle letterpress graphics.
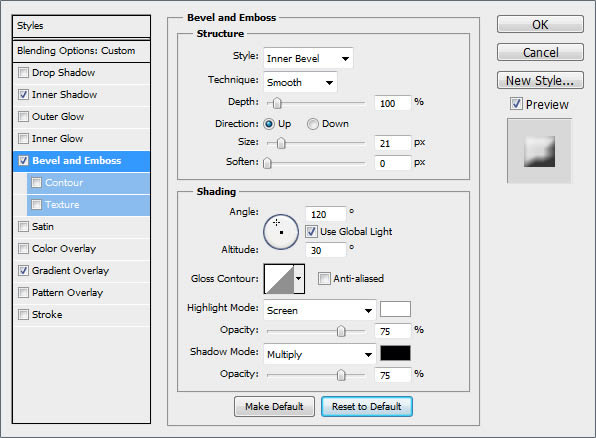
The Layer Styles Bevel and Emboss Dialog Boxes
The Bevel and Emboss dialog boxes are shown below, giving us a slew of new options. These will allow to set things like bevel height, lighting direction, texture map, and more.
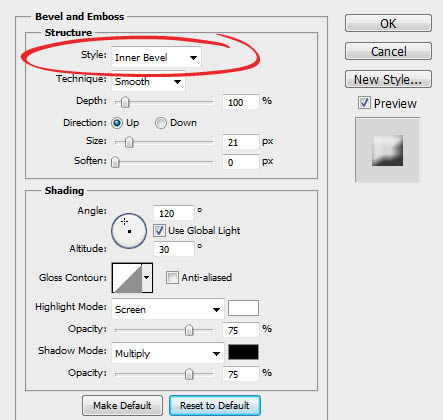
Style
The Style dropdown is where you set the style/location of your bevel and includes the following options:
- Outer Bevel: This applies the bevel to the outside of the shape you are applying it to
- Inner Bevel: This applies the bevel to the inside of the shape you are applying it to
- Emboss: This applies the bevel to both the outside, and the inside of the shape you are applying it to
- Pillow Emboss: This applies the bevel to both the outside and inside of the shape you are applying it to, but in opposite directions
- Stroke Emboss: This only works when you also have a stroke effect applied to your layer, and applies the bevel only to the stroke
It may seem confusing, but simply scrolling through the different Style settings with the Preview box checked will quickly show you how they each work.
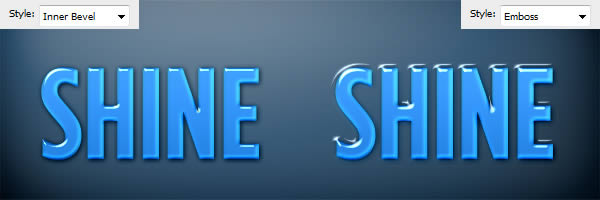
In the following example, you can see that with Inner Bevel applied, it only affects the inside of the shape. With the Emboss style applied, the Bevel and Emboss affects both the inside and outside of the shape.
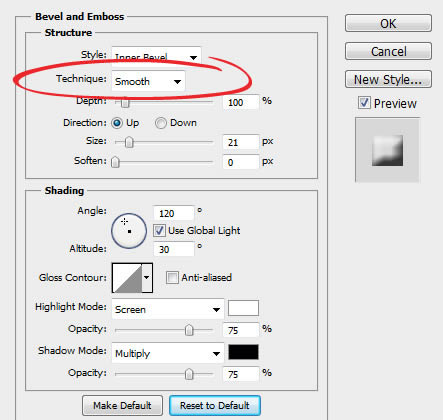
Technique
The Technique dropdown menu allows you to set the overall shape of the Bevel and Emboss and includes the following options:
- Smooth: This setting creates a smooth, rounded edge bevel
- Chisel Hard: This setting creates a hard, chiseled edge bevel
- Chisel Soft: This setting creates a rougher, chiseled edge bevel
Again, the best way to see the difference is to scroll through the settings with the Preview box checked.
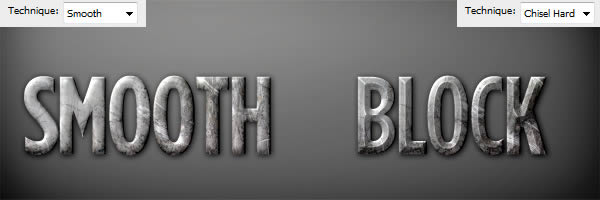
In the following example, you can see that text on the left is more smooth while the text on the right looks like it has been chiseled out of stone.
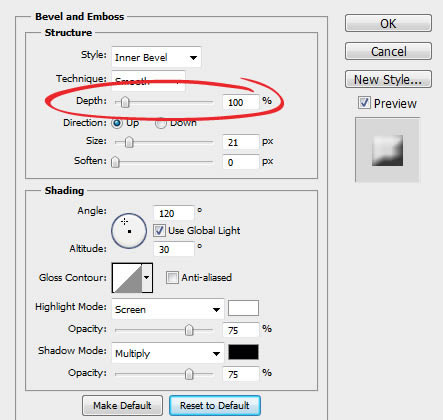
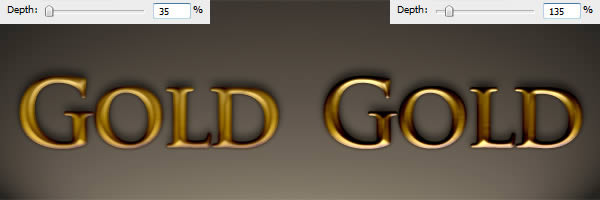
Depth
The depth slider increases or decreases the apparent depth of the Bevel and Emboss. A lower number creates a less visible 3D effect while a higher number makes it more dramatic.
In the following example, you can see how increasing the Depth makes the text look more 3-dimensional.
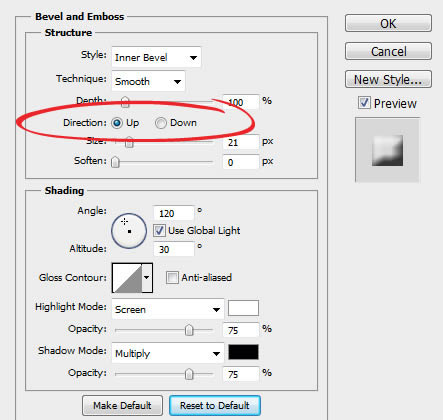
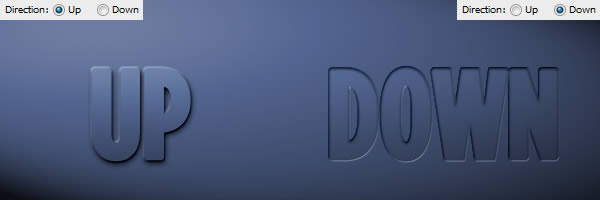
Direction
The Direction radio buttons simply let you choose whether you want your Bevel and Emboss to appear to be extruded towards you, or away from you.
In the following example, you can see how the "up" text appear to come out of the page, while the "down" text appears to sink into the page.
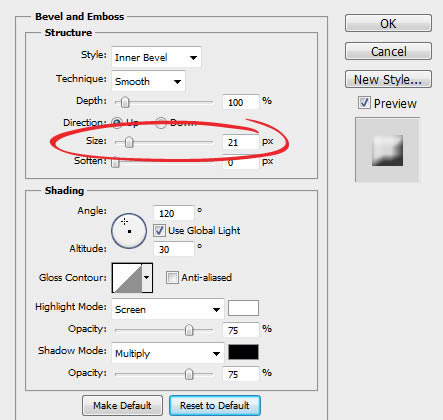
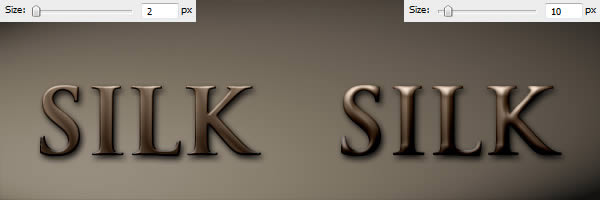
Size
The Size slider sets the overall size of the Bevel and Emboss. A lower number creates a smaller effect that stays closer to the edges of your shape, while a larger number increases the Bevel and Emboss coverage to a bigger area of your shape.
In the following example, the text on the left has a smaller bevel while the one on the right covers much more of the text.
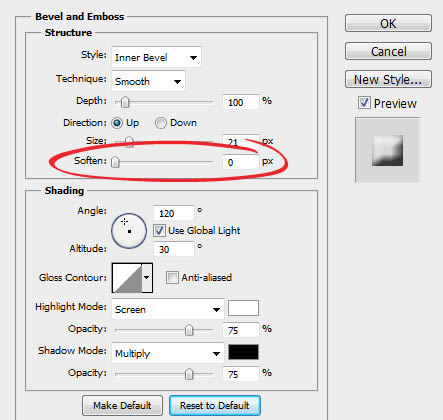
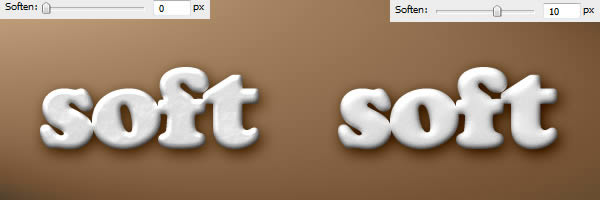
Soften
The Soften slider allows you to soften any hard edges created by your Bevel and Emboss. It can be helpful in creating soft and squishy looking styles.
In the following example, you can see that increasing the Soften parameter helps us to create a much softer looking surface.
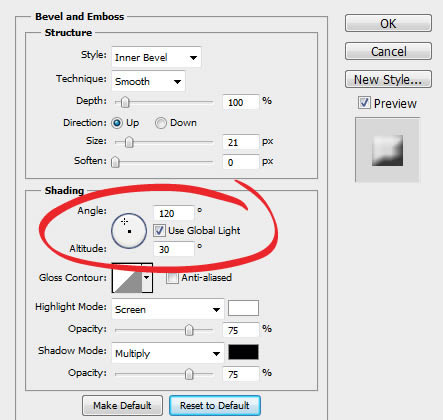
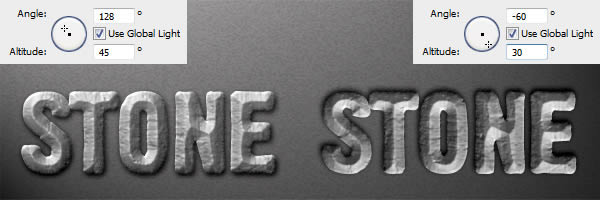
Angle and Altitude
The Angle and Altitude area is where you set the position of your light. The Angle sets the horizontal position of your light source, and the Altitude sets the vertical position, or apparent height of your light source. You can also drag the small crosshair around to edit your light source without having to use numeric values.
Checking the "Use Global Light" checkbox will sync these settings with any other lighting related settings in your document like Inner and Outer Shadow.
In the following example, you can see how changing the Angle and Altitude settings affects the perceived location of our light source.
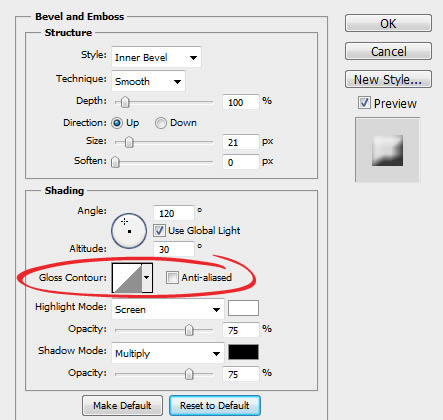
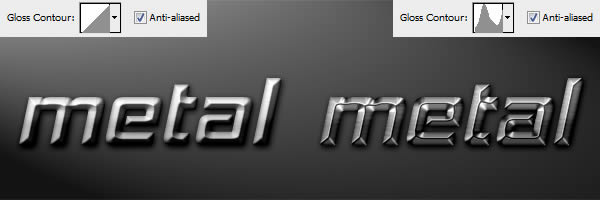
Gloss Contour
Gloss contour is the secret to creating great glass and metal effects.
The Gloss Contour sets the falloff of the shadows and highlights within our Bevel and Emboss. A linear contour creates a natural looking falloff, while choosing something like a "sine wave" style contour can create cool, reflective effects.
In addition, the Anti-aliased checkbox will smooth out any jagged edges within your gloss if it is desired.
In the following example, you can see how the text on the left looks nothing like metal, but by changing the Gloss Contour, it begins to look more realistic.
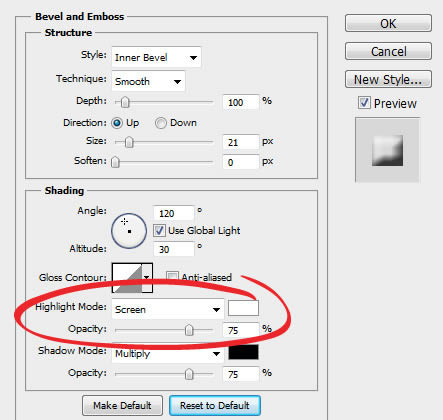
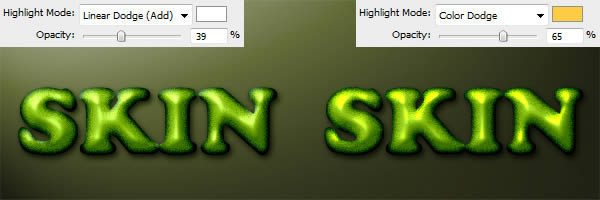
Highlight Mode and Opacity
There are two parts to lighting, highlights and shadows.
The Highlight Mode dropdown is where you set the blend mode for your highlights. Screen is the default setting, but you can also try Linear Dodge (Add), and Color Dodge for more dramatic effects.
This is also where you set your highlight color. Most of the time you will leave it at white, but if you want to simulate different color light sources, you can change the highlight to have a tint of color.
The Opacity slider adjusts the intensity of your highlight edges.
In the following example you can see how changing the Highlight Mode, Color, and Opacity gives our style a slightly different, warmer look.
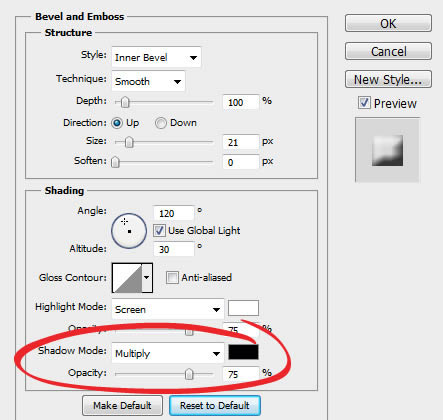
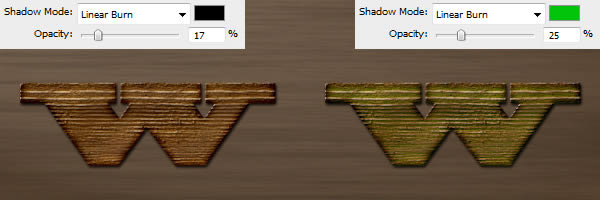
Shadow Mode and Opacity
The Shadow Mode dropdown is where you set the blend mode for your shadows. Multiply is the default setting, but you can also try Linear Burn or Color Burn for more dramatic effects.
This is also where you set your shadow color. Most of the time you will leave it at black, but you can also achieve other subtle effects by using different tints of color.
The Opacity slider adjusts the intensity of your shadows.
In the following example you can see how changing the Shadow Color and Opacity gives our wood style a subtle "mossy" look.
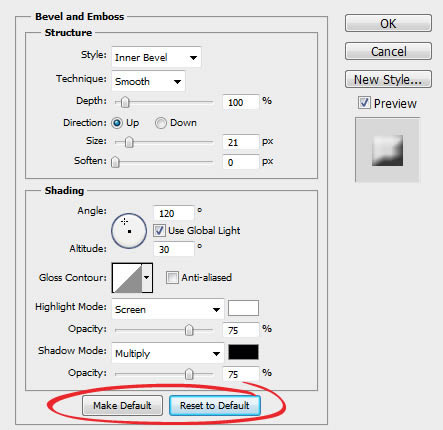
Saving And Loading Default Settings
You can save and load default settings for each effect in the Layer Styles dialog box. By clicking "Make Default", Photoshop will store whatever settings are currently active as the new default settings for that effect.
By clicking "Reset to Default", Photoshop will then load whatever settings were last saved. This allows you to experiment and simply reload custom default settings if you want to start over.
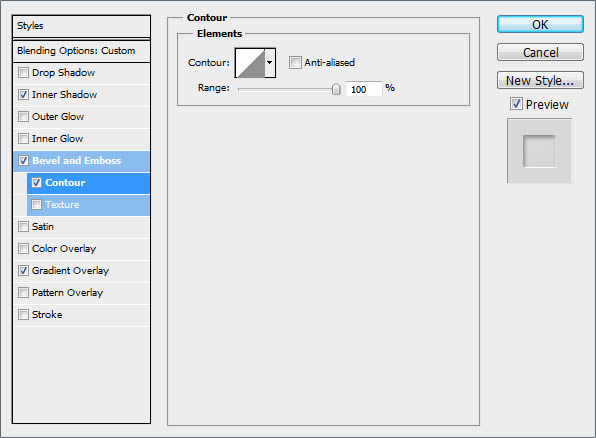
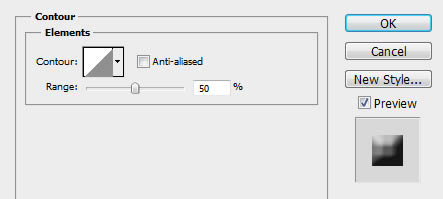
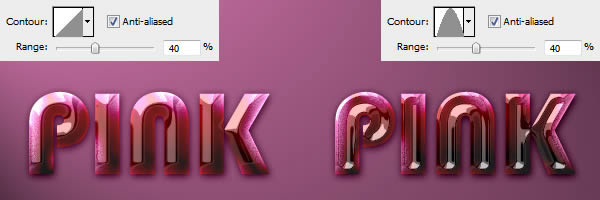
Contour
The Contour sub-section under Bevel and Emboss allows you to set the overall shape of your bevel. Checking the Anti-aliased checkbox smooths out your Contour, and the Range slider allows you to set the overall coverage of your bevel that you want your chosen contour to apply to.
This is another setting that is easier seen than said.
In the following example you can see how changing the Contour to aninverted "U" shape gives our text an indented type of bevel.
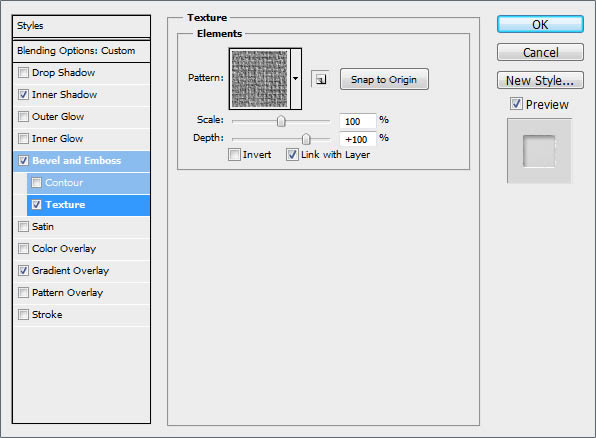
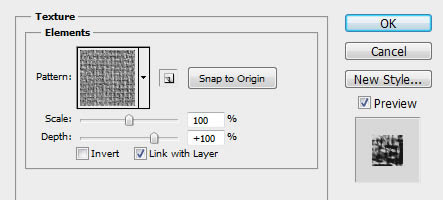
Texture
The Texture sub-section under Bevel and Emboss allows you to add a bump map to your style. A bump map makes the surface of your layer to appear higher or lower, giving us the ability to create special effects.
The Pattern area allows us to choose a pattern from Photoshop’s Patterns Palette to use as a bump map. Click the Snap to Origin button to align the Pattern to the origin of your document. You can also click the small "New" icon to create a new preset from your currently select Pattern.
The Scale slider lets you increase or decrease the size of your pattern, and the Depth slider changes the apparent depth of your bump map.
You can check the Invert checkbox to invert your pattern, make white areas black and black areas white.
Lastly, the Link with Layer checkbox locks the Pattern to your layer, so that if you move your layer around after closing the Layer Styles dialog box, the Pattern moves with it.
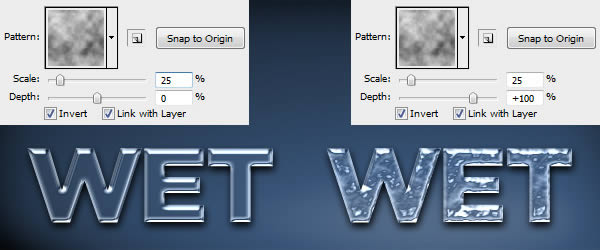
When the Layer Styles dialog box is open to the Contour sub-section, you can also drag the Pattern around on your canvas to position it manually.
In the following example you can see how adding a Pattern to our style can create a dramatically different looking effect. Since the Depth is set to "0" for the text on the left, the Pattern does not affect our style.
One For The Road
Until next time, this free, exclusive layer style and accompanying .PSD will help you dissect how all the different Bevel and Emboss settings can change the look of your images.
Inscription à :
Articles (Atom)